

Take Better Photos of Flowers 🌼
Flower photography is surprisingly specific - give these tips a try if your sunflower snaps aren't impressing anybody.
One of my favorite events of the year (because I’m weird, or maybe just a photographer) is the Hong Kong Flower Show, which is exactly what it sounds like – a sprawling outdoor exhibition of eleventy billion flowers. It occurs around mid-March every year, when the weather is warm but not yet oppressive, and the cost of entry is a paltry two US dollars. It was one of the things I missed the most, in fact, when it was cancelled three years running during the pandemic. According to my photographic archives, I first attended in 2017; 2026 was my seventh visit.
I don’t go for the ambience. Truth be told, like most things in Hong Kong, the flower show is overrun with people of all sorts from open ‘til close. You can, at least, pick your poison: Weekend? Domestic helpers and tourists. Weekday? School trips and the elderly. And they’re all taking photos of the flowers, with the flowers, in the flowers, with their phones. I’d love to know how many terabytes of these snaps the hordes dump onto social media platforms each day. Actually, I probably wouldn’t.
And most of those photographs are trash. I know because I watch people take them.
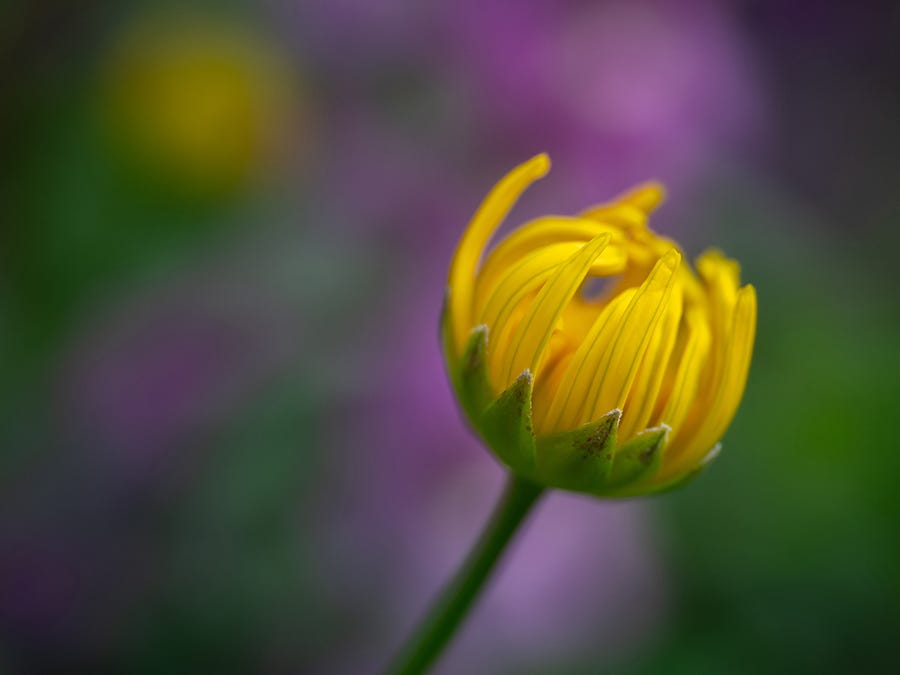
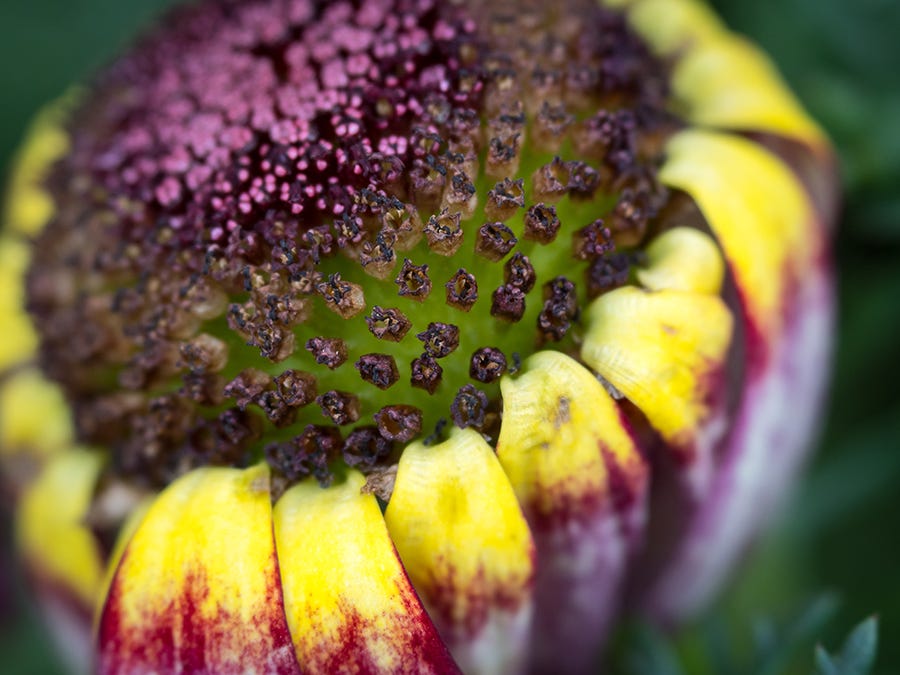
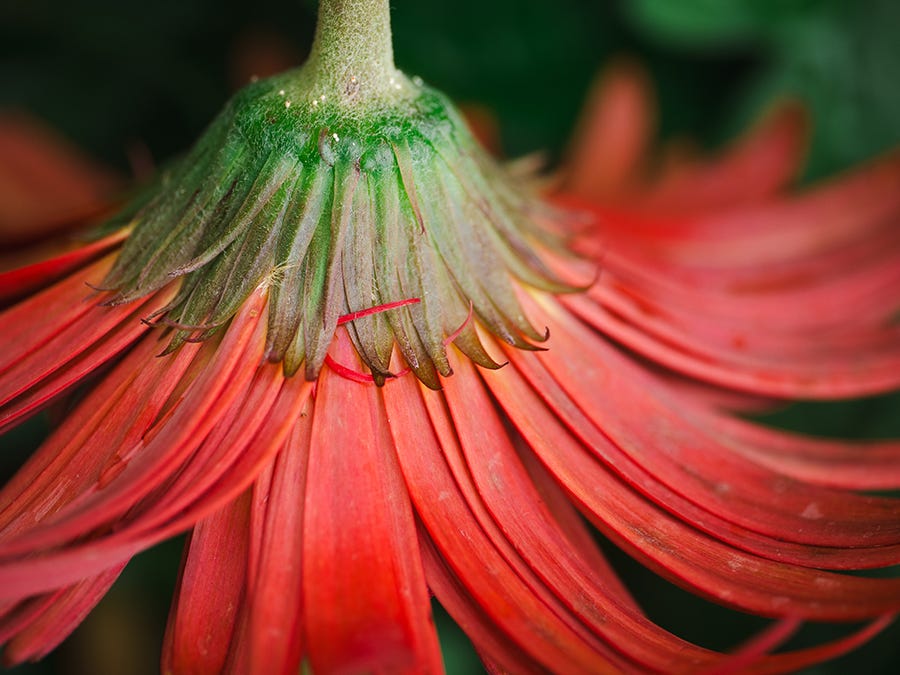
Look, I’m not here to argue with you if you think your iPhone 17 takes great photographs of flowers. (It doesn’t, but if you think it does, what do I know? I’m just some guy on the internet.) If you’d like to level up your flower photo game, here’s everything I’ve learned about photographing these colorful little organisms from my seven years of shooting the Hong Kong Flower Show. (All images in this article are my own, taken over those seven years.)
Section 1 – Gear
Let’s talk equipment. There is only one thing that is an absolute necessity for shooting good pictures of flowers, and that’s a macro lens*. I mean it. This is the sine quā nōn of flower photography: a true macro lens, one that does life-sized 1:1 magnification. Now, you can still get good results with something that does at least 0.5x magnification, like the Lensbaby Velvet 56, which I’ve taken to more than one flower show, but if you can get your hands on a dedicated macro lens, you do it. Y’hear?
If you don’t know what I’m talking about, macro lenses are specially designed to allow extremely close focusing so you can achieve that true 1:1 subject-to-sensor ratio. This means that you can get close enough that the object you’re photographing takes up as much space in the frame as it would in real life if you put it on the camera’s image sensor. Some lenses can do even greater magnification than that, but any lens labeled “macro” should do at least 1:1. (This does not stop some unscrupulous lens manufacturers from putting the word “macro” on their lenses when they’re not capable of this kind of magnification. A pox on them.)
For the reader who doesn’t already have a macro lens, I have good news – you don’t need to spend a lot of money to get one. Yes, every lens manufacturer makes fancy ones with extra features like auto focus, weather sealing, and fast apertures, but you don’t need these things. For example, OM System makes a 90mm macro lens with image stabilization, auto focus, and 2:1 magnification. I’m sure it’s amazing, but it’s $1,499 and overkill for this assignment. I’ve shot the last two flower shows with a comically tiny (it weighs 240 grams and fits in a pants pocket) Laowa 50mm f/2.8, which doesn’t have auto focus or image stabilization but will do up to 2:1 magnification. Several of the images you’re seeing here were taken with it. It’s $399 new.
But you can spend even less than that! Find an old manual focus macro lens with a different mount, say Canon EF or Nikon F, and just use it with a cheap adapter. There are even reversing rings that allow you to mount a camera lens backwards to unlock its hidden macro capabilities. You do not need to spend a lot of money to get an appropriate tool for the job here!
Ok, with the necessity (I mean it! Go get a macro lens!) out of the way, let’s talk about some nice-to-haves. I’d recommend a current-ish mirrorless camera body over a DSLR. I only say this because most mirrorless camera bodies have extremely useful (bordering on indispensable, once you get used to them) features like viewfinder zooming and focus peaking. The first is what it sounds like – since the viewfinder on a mirrorless camera is electronic (it’s basically a live video feed of the sensor), you can zoom in on any part of the frame to get a closer look at what’s in focus. (Some DSLRs can sort of do this, like Canon’s “Live View”, but you need to use the rear LCD, not the viewfinder.) Focus peaking is a feature that shows a visual cue on the in-focus area of an image in the viewfinder, usually a high-contrast color like red. This way you can see exactly what parts of the image are in focus even if your eyes aren’t so good. Trying to do macro photography without these two things is not very fun. Not impossible, but a decidedly less-good time.
You might call me crazy for putting this last thing in the nice-to-have column, but that’s how I feel about a tripod in this situation. Nice to have. It’ll absolutely cut down on the number of shots you need to take to get good results compared to hand-holding. I almost never use one at the flower show, but that’s a personal preference more than anything else. Plenty of other photographers there do, so it’s clearly not crazy, but I tend to want to work faster and move around more to capture the whole show in one day, and a tripod slows me down too much to accomplish that. If you’ve got a good one, bring it along and try it out.
(A bonus nice-to-have – knee pads. You’re going to be doing most of this work very close to and/or on the ground.)
Section 2 – Working the Camera
Now that you’ve got yourself a macro lens (right? a real one?) and a mirrorless camera, you’re ready for action. All of the standard concerns apply here, so let’s talk about shutter speed, aperture, and focusing. (One bit of advice up front – shoot in RAW to give yourself the most headroom in Section 4 – Editing.)
Since you’re going to be taking pictures of things close-up at high magnification, you’re going to need to keep those shutter speeds up to eliminate blurriness due to camera movement. (This is, of course, assuming you’re not using a tripod.) This shouldn’t be a problem if you’re shooting outside in daylight, but pay attention if you start stopping down the aperture. (If it’s windy, just go home. It’s not worth the headache.) Watch out for the opposite problem as well – on a sunny day at wide apertures, you may exceed your camera’s maximum shutter speed. Review your images at the beginning to make sure they’re properly exposed and not blurry.
Understanding aperture is extremely important for good results here. (I generally shoot in aperture priority mode [Av on the camera dial] when I’m at the flower show.) Depth-of-field (the range of the photo that’s in focus) gets very shallow the closer you get to your subject; this is one of the biggest difficulties in macro photography. (The shallow focus effect is stronger on larger sensors, so grab an APS-C or MFT body for this job if you have one.) Play around with settings to find the look that you want. Start with the lens wide open; if the DOF is too shallow, stop the aperture down and/or move away from the subject to increase depth of field. Be careful to find the right balance – if you stop down too much, your shutter speeds may get too slow, and too much of the background will be in focus, distracting from the subject.
[For more advanced users, there is a technique to fix this problem called focus stacking, in which multiple images are taken at different focus distances and combined afterwards, but this is not the easiest thing to learn to do (and impossible without a tripod). It is a good solution to the depth of field problem and can produce amazing results, so feel free to explore it more if it interests you, but none of the images you see here are focus stacked.]
Finally, let’s talk about focusing at these high magnifications. You really do need to nail focus in this type of photography, as the tolerances are quite literally razor thin. You might be tempted to rely on auto focus if your lens has it, but in truth it’s no advantage in this case. Turn it off and focus manually instead. (There’s one exception to this, which I’ll mention at the end.)
If you’re doing this work hand-held (like me, the masochist), the best method to get shots with your desired focus is not to turn the focus ring, but to move the camera closer or further from the subject. You’re not going to be able to hold yourself perfectly still anyway, so there’s no point in trying to turn the focus ring while you’re inadvertently swaying around. (You might think that you can hold a camera perfectly still, but up close at 1:1 magnification you will discover that you are wrong.) You can turn the focus ring to get the subject close to in focus at the distance you want to shoot, but to get precise focus, just move yourself toward or away from the subject as slowly and deliberately as you can. You can use your camera’s burst mode to capture multiple images as you slightly adjust focus front to back. Be prepared to delete most of the images you capture when you shoot this way – my keeper rate this year was about 10% – but it will get the job done.
Section 3 – Composition
Even though you’re trying a strange and novel kind of photography, there are still basic rules that you should aim to follow just as you would when you shoot anything else. There are a bunch of these, so let’s just bullet-point our way through them:
Look for good light. Direct sunlight can be too harsh for the bright colors of flowers. An overcast day is better for shooting outdoors; if it’s sunny, shoot early in the morning or late in the afternoon to get more diffuse light. Avoid dappled light (a sharp mix of light and shadow) at all costs. If you’re stuck with bright sun, create some shade over the scene you’re photographing by blocking the light with anything you have handy.
Consider normal rules of composition like the rule of thirds, negative space, framing, leading lines, the golden ratio, and symmetry. Your composition needs to be balanced and thoughtful in addition to in focus!
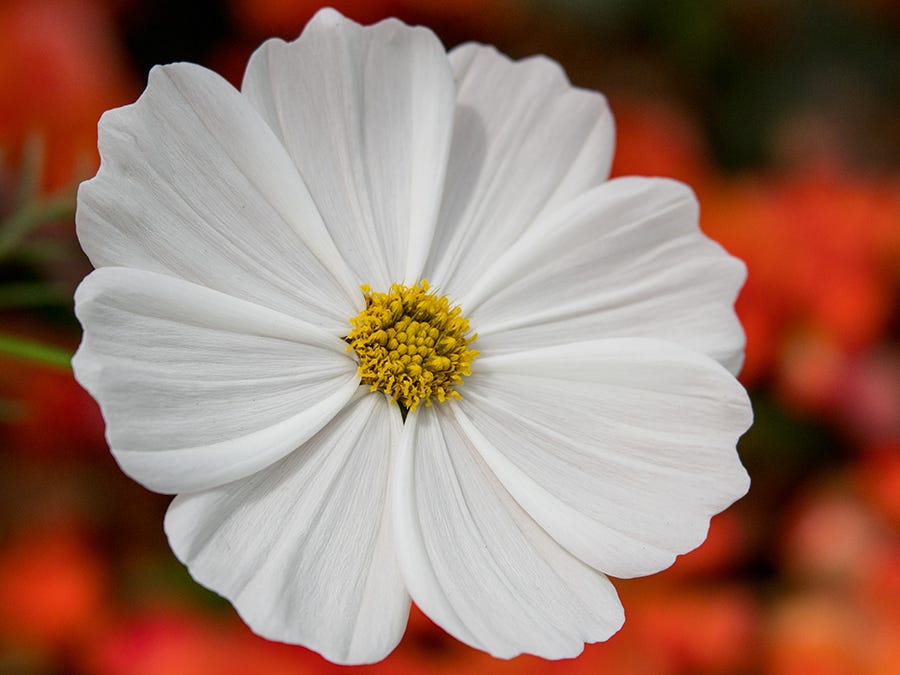
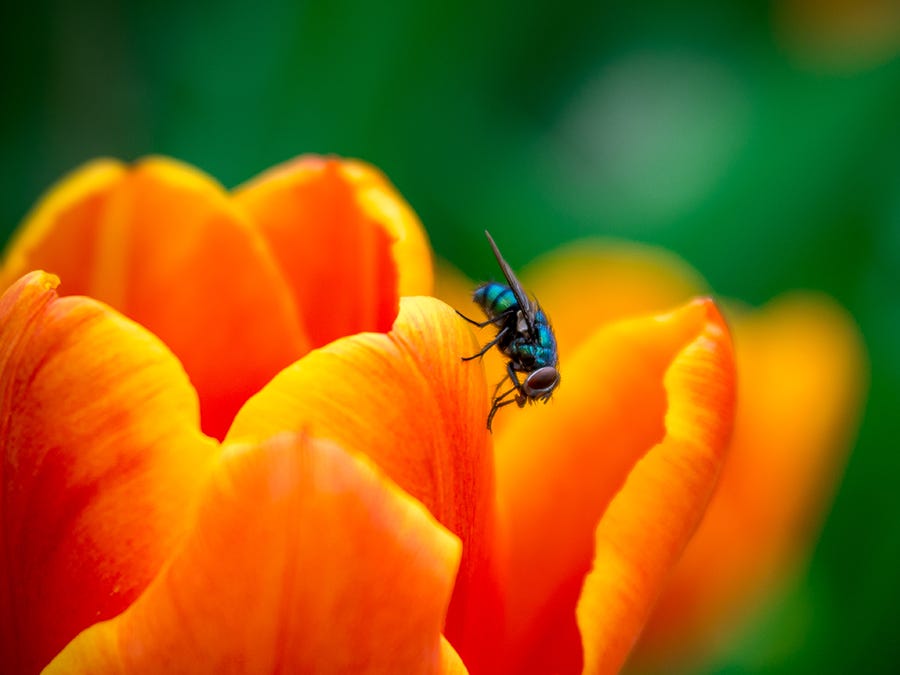
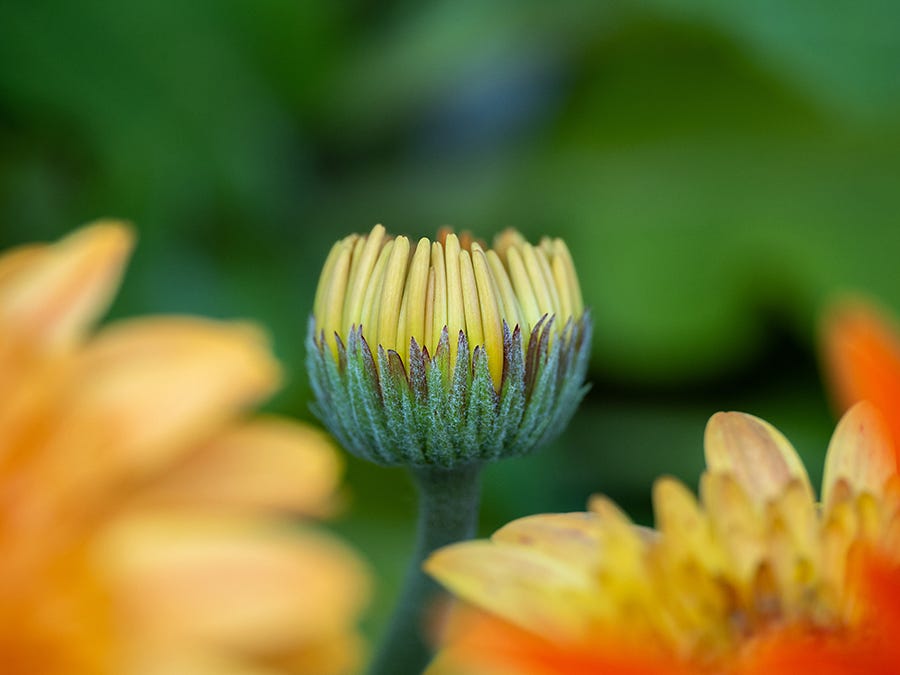
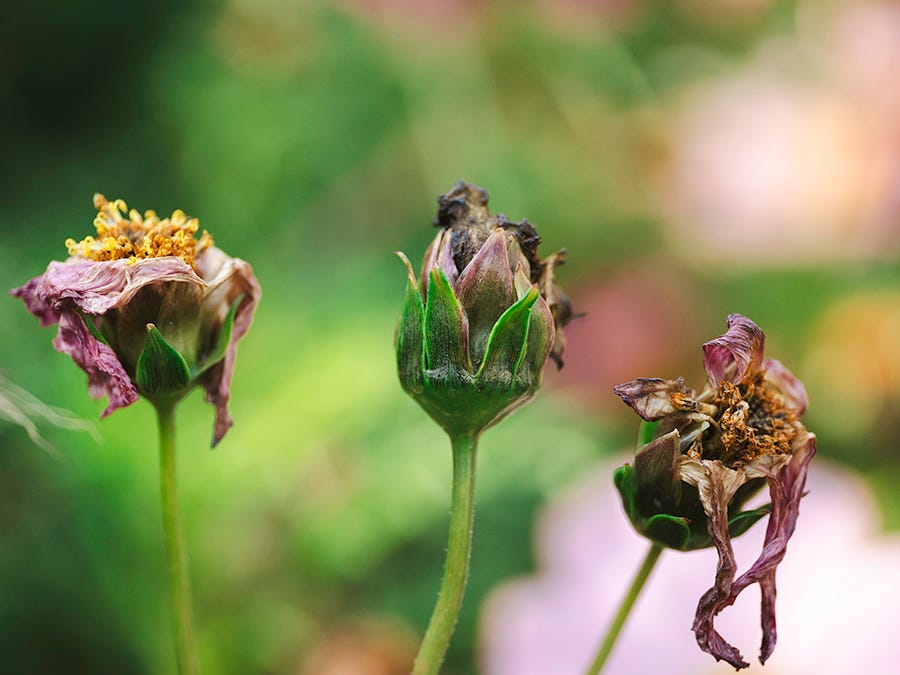
Look for interesting subjects. For me, that means water droplets (feel free to add your own with a spray bottle – nobody will know!), bits of pollen, wonky or wilting blossoms, and little critters like insects crawling on petals.
Sink to their level. We humans tower like feudal Lords over flowers, which, lowly creatures as they are, remain close to the soil from which they emerge. As such, we’re used to seeing flowers from the top and at some distance. To make your photographs more interesting, get down at eye level (or below!). You might need to get a little dirty or wet to get the good stuff.
Focus on single blossoms. Photos of sprawling fields of sunflowers and tulips can be spellbinding, but you don’t need a macro lens for that. Find one flower or small cluster and focus on isolating it from the rest. Get closer and keep the frame clean and uncluttered.
Mind the background! It’s very easy to ignore the out-of-focus areas in your composition while you’re trying to pay attention to the subject, but take a moment to look at the entire frame. Are there prominent distractions interfering with your subject? Sometimes just moving an inch or two in one direction can clear up the background so your subject can shine.
Section 4 – Editing
Now that you’re back at your house with all of these amazing RAW images of flowers, it’s time to tidy them up a bit and get them ready for public consumption. Make global corrections first, like adjusting the white balance, correcting chromatic aberration, and fixing lens distortion and vignetting. From there, try to keep your editing localized to the parts that need it.
For example, instead of grabbing the hue/saturation sliders and overcooking the entire scene, focus in on individual colors and only adjust what’s needed (Lightroom makes it very easy to do this). Same goes for sharpening – if you have a single flower subject and a blurred background, apply sharpening to the flower only, not the whole scene. Keep an eye on the histogram to make sure you’re not clipping any highlights, shadows, or bright colors. (Working with RAW files will help dramatically with this.)
Finally, don’t be too precious about the “accuracy” of the scene. I, for example, prefer my green hues nudged a bit to the blue side, so I always adjust my greens that way even though the “true” scene appeared more yellow. I also love (too much! I admit it!) to use vignettes on flower images to draw attention to the subject. I frequently remove distractions and imperfections to produce a final image of a much more perfect flower than I actually saw that day. Don’t feel bad about doing this! If somebody tries to tell you that you’re being dishonest or misrepresenting reality, poke them in the eyeball.
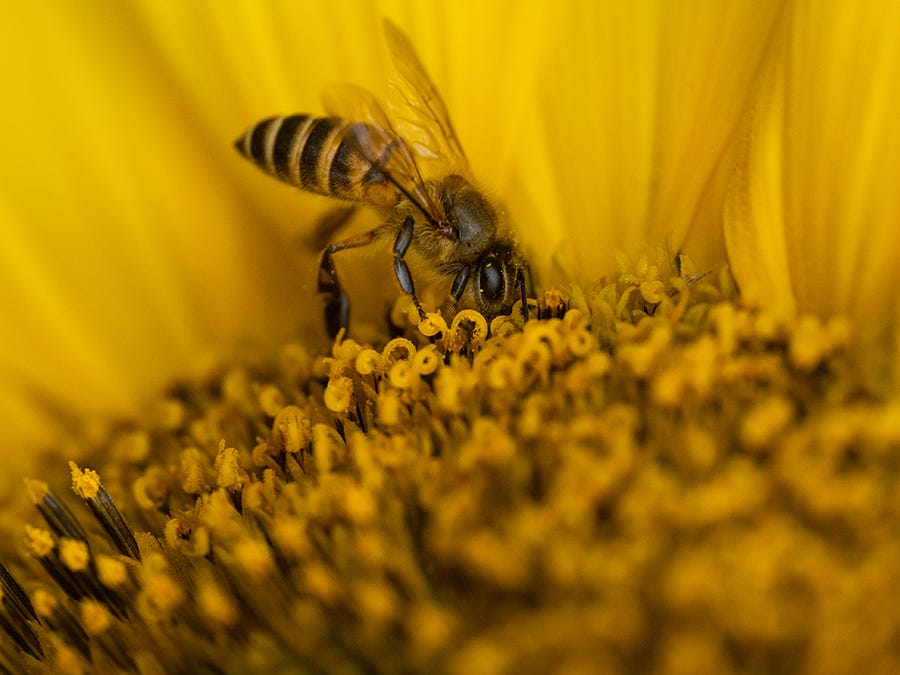
That one exception I mentioned before – BIF (bees in flight)
I love to try to photograph bees (and other insects, but mostly bees) at the flower show, and when I’m successful, they’re my favorite images. (I just think they’re kind of cute up-close, ok? They’re fuzzy.) Getting macro shots of live bees with a manual focus lens is difficult nearly to the point of futility. I’ve never used a macro lens with auto focus, but I have to think that it would be a very helpful feature in this situation. That said, it is possible to do this with manual focus. You’ll need to be patient and persistent. (And, like, probably not allergic to bees. Don’t sue me if you get Macaulay-Culkin-in-My-Girled.) Again, use burst mode to increase your chances of keepers, and move forward or backwards to focus instead of twisting the focus ring.
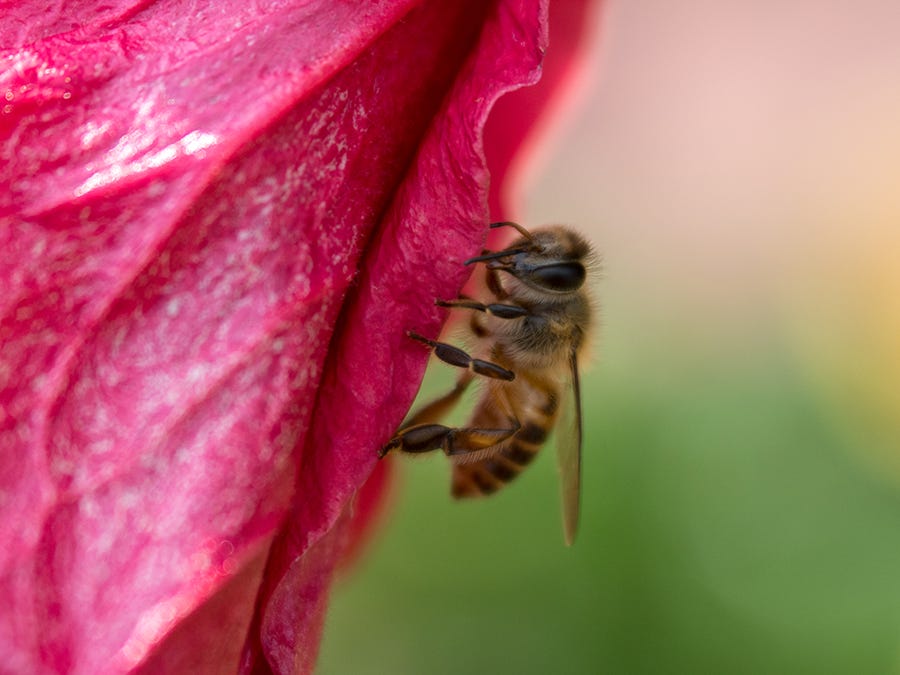
Once you’ve got a bee in your sights, follow it until it lands and sits still for a moment, get it in focus, and shoot like crazy. Yes, this is going to put you in very close and repeated contact with bees. In my experience at the flower show, the bees are like kids in a candy store, so drunk on nectar and pollen that they’re not interested in anything else, so I haven’t had any trouble. YMMV. (If you really want a buffer, use a macro lens with a longer focal length, like 100mm, or even 150 or 180. This will let you fill the frame with the stingy critters from further away.)
Most importantly, just go try it
Flowers are ubiquitous, and when you’re getting down amongst them in the macro realm, you really can do this kind of shooting wherever you encounter them. You don’t need to fly out for the Hong Kong Flower Show. Hop the fence when your green-thumbed neighbor isn’t looking and go to town on her rhododendrons. You won’t start to perfect this kind of photography until you, you know, … start.
Other photographers out there, feel free to chip in with your own tips and tricks for up-close flower photography - I’m sure there’s more that I could learn as well!
This was very helpful! Thank you!